

Hello, everyone! I hope you’re doing well. In today’s post, I am thrilled to introduce you to an incredible Lightroom Green Preset that will effortlessly enhance your photos with a single click. This powerful editing tool is not only designed to elevate your images with a vibrant and captivating green tone but is also entirely free to download.
If you’re looking for a simple yet effective way to enhance the visual appeal of your photographs, this Lightroom Green Preset is the perfect solution. With its ability to create stunning green tones and bring your images to life, it caters to photographers of all skill levels—from beginners experimenting with photo editing to experienced professionals seeking efficiency in their workflow.
This preset eliminates the hassle of time-consuming edits and provides a quick way to achieve consistent, high-quality results. Whether you’re capturing lush landscapes, outdoor portraits, or nature-inspired imagery, this preset adds a fresh, polished look that takes your photos to the next level.
To make the most of this incredible tool, I’ve provided step-by-step instructions below that will guide you through downloading and applying the preset to your images seamlessly. The process is straightforward, ensuring that even those new to Lightroom can enjoy its benefits without any technical challenges.
Let’s dive into this fantastic opportunity to streamline your editing process and elevate your photography game. With this free Lightroom Green Preset, achieving professional-grade results has never been easier. So, go ahead—download the preset today and see the difference it makes in transforming your photos into stunning works of art!
About the Lightroom App
Lightroom, developed by Adobe, stands out as one of the most comprehensive and versatile tools available for photo editing. Whether you’re an amateur just starting your photography journey or a seasoned professional, Lightroom offers an exceptional suite of features designed to elevate your editing experience. This powerful application has truly revolutionized the world of photo editing, delivering a platform that combines ease of use with advanced functionality to produce remarkable results.
One of the key aspects that makes Lightroom a favorite among photographers is its ability to perform professional-grade photo editing on mobile devices. This feature allows users to edit their images on the go, without compromising on precision or quality. From basic adjustments like cropping and straightening to advanced tweaks such as color grading and tone curve manipulation, Lightroom makes it easy to refine your photos, no matter where you are.
What makes the app even more appealing is its use of Lightroom presets, which simplify the editing process significantly. These presets allow users to apply a pre-configured set of adjustments to their photos with just one click. This not only saves time but also ensures consistency across multiple images, a feature particularly valuable for social media influencers, content creators, and photographers working on large projects. Unlike many other editing apps, Lightroom’s presets are designed to deliver professional-quality results while giving users the flexibility to fine-tune the adjustments further to match their vision.
One of Lightroom’s most remarkable qualities is its commitment to preserving the original quality of your photos. While some editing apps may compromise image resolution or introduce distortions during the editing process, Lightroom ensures that your images retain their sharpness, detail, and clarity—even after significant edits. Whether you’re enhancing a breathtaking landscape, fine-tuning portrait lighting, or experimenting with creative effects, Lightroom’s non-destructive editing capabilities ensure that your photos remain pristine.
For photographers and enthusiasts who value both quality and efficiency, Lightroom is an invaluable tool. Its intuitive interface, powerful editing features, and the ability to maintain the integrity of your images make it an unparalleled choice in the world of photo editing. With Lightroom, you can confidently take your photography to new heights, knowing that every edit enhances your photos without ever compromising their brilliance.
Lightroom App All Tools
Lightroom is renowned for its wide array of powerful tools that cater to the needs of photographers and editors, whether they’re beginners or professionals. Each tool is thoughtfully designed to help users achieve professional-quality results with precision and efficiency. Below, we’ve outlined some of the most essential tools in Lightroom and how they can elevate your photo editing experience.
Auto Tool
The Auto tool is perfect for those who want to make quick, effortless adjustments to their photos. With a single click, Lightroom automatically enhances your image by optimizing lighting, exposure, and contrast. This feature analyzes the photo’s existing conditions and applies intelligent corrections, making it an excellent starting point before you delve into more detailed manual editing.
Light Tool
The Light tool is indispensable for fine-tuning the brightness, exposure, and overall tonal range of your photo. If your image is too dark, you can easily brighten it, or darken overexposed areas to achieve the perfect balance. Additionally, this tool allows you to adjust shadows, highlights, and contrast with remarkable precision, giving you complete control over your photo’s luminosity.
Color Tool
One of Lightroom’s standout features is its robust Color tool, which empowers you to modify and enhance the hues, tones, and overall color grading of your photos. Whether you want to enhance natural colors, desaturate certain tones, or create artistic effects with bold color adjustments, this tool provides endless possibilities. You can also adjust vibrance and saturation to refine the intensity of colors, ensuring your image reflects your creative vision.
Effect Tools
The Effect tools are designed to add the perfect finishing touches to your photos. These tools allow you to introduce texture, clarity, or dehaze effects, which can add depth and dimension to your images. For those looking to create a vintage aesthetic or a cinematic feel, the grain effect is an excellent option. Each effect can be adjusted to suit your specific needs, enabling you to personalize your edits fully.
Detail Tool
The Detail tool focuses on enhancing the fine aspects of your image while maintaining its natural appearance. This tool is particularly useful for sharpening edges and reducing noise, ensuring that your photo looks crisp and polished without sacrificing quality. It’s ideal for capturing intricate textures or refining high-resolution images.
Optics
For photographers who want their images to appear distortion-free and true to life, the Optics tool is a game-changer. This feature helps correct lens distortions, remove chromatic aberrations, and apply lens profiles for better accuracy. Whether you’re dealing with wide-angle distortion or color fringing, the Optics tool ensures your photos look professional and visually accurate.
Geometry
The Geometry tool is essential for photographers who work with architectural or landscape photography. This feature allows you to straighten lines, adjust perspectives, and align compositions with precision. Whether you’re correcting tilted buildings or ensuring symmetry in your shots, the Geometry tool ensures your photos have a polished, professional finish.
Healing
The Healing tool is an invaluable resource for removing unwanted objects, blemishes, or distractions from your photos. Whether you need to erase dust spots, smooth out skin imperfections, or remove an object from the background, this tool makes it easy to correct flaws seamlessly without compromising the quality of the image.
Crop
The Crop tool is fundamental for refining the composition of your photos. It enables you to trim edges, rotate images, or straighten your photo for better framing. With intuitive guidelines and aspect ratio options, the Crop tool helps you create visually appealing compositions that draw the viewer’s attention to the subject.
Masking
Masking is one of Lightroom’s most powerful and versatile tools, allowing you to apply adjustments selectively to specific areas of your photo. Whether you want to highlight a subject, enhance the background, or apply targeted edits to particular elements, the Masking tool provides unparalleled control. This feature is perfect for creating detailed, focused adjustments that elevate the overall quality of your image.
With these tools and many more, Lightroom proves to be a comprehensive photo editing solution. Its flexibility and precision make it suitable for everything from quick edits to advanced, intricate projects. By mastering these features, you can unlock the full potential of your images and bring your creative vision to life with ease.
How do you use presets in the Lightroom mobile app?
Using presets in the Lightroom Mobile app is a fantastic way to simplify your photo editing workflow while ensuring your images achieve a consistent, professional-quality look. Presets allow you to apply pre-configured adjustments to your photos with just a few taps, making the editing process faster and more efficient. Here’s a comprehensive step-by-step guide on how to use presets in the Lightroom Mobile app effectively:
1. Download and Import the Preset
To begin, you’ll need to download the desired preset. If you’ve obtained a preset from an external source, such as a website, a photography community, or a friend, ensure that it is in a compatible format like DNG (Digital Negative). Once the file is ready, follow these steps:
- Open the Lightroom Mobile app and navigate to the Library tab.
- Tap the Add Photos button, typically represented by a + icon.
- Locate and select the DNG file from your phone’s storage or gallery.
- Once imported, the DNG file will appear in your Lightroom library as a new image with the preset applied.
This imported image serves as your preset template, ready to be saved and applied to other photos.
2. Apply the Preset to Your Photo
Once the preset is imported, it’s time to apply it to your photos. Follow these steps:
- Open the photo you wish to edit in Lightroom Mobile.
- Scroll through your library to find the imported DNG file. Tap to open it.
- Tap the three-dot menu in the upper-right corner and select Create Preset.
- Assign a name to your new preset, and choose which settings you want to save. You can either save all adjustments or pick specific ones (like exposure, color grading, or effects).
- Tap Save to finalize the creation of your custom preset.
This step ensures the preset is saved in your collection, making it accessible for future edits.
3. Use the Preset on Other Photos
Now that your custom preset is saved, applying it to other photos is a breeze:
- Open the photo you want to edit in Lightroom Mobile.
- Tap the Presets button, which is usually located near the bottom of the screen, just below the main editing tools.
- Under the User Presets section, you’ll find the preset you just created.
- Tap the preset to instantly apply its adjustments to your photo.
This quick application allows you to maintain a consistent editing style across multiple images, making it ideal for photo series or social media content.
4. Adjust the Preset Settings (Optional)
Although presets provide a great starting point, every photo is unique and may require additional fine-tuning. After applying a preset:
- Use Lightroom’s editing tools, such as exposure, contrast, color, or cropping, to tweak the photo further and match your vision.
- If the adjusted version of the preset works better for specific scenarios, you can save these changes as a new preset. Simply repeat the steps in Step 2 to create an updated preset for future use.
5. Sync Presets Across Devices (Optional)
If you’re using Lightroom with cloud sync enabled, all your presets are automatically saved to your Adobe account. This feature ensures that your presets are accessible on any device where you log into Lightroom, whether it’s your phone, tablet, or desktop. This seamless syncing allows you to maintain consistent edits regardless of the device you’re using.
6. Explore and Download More Presets
For those looking to expand their editing toolkit, Lightroom Mobile offers built-in presets under the Discover tab. These presets are designed by professional photographers and can be applied directly to your photos. Additionally, you can find countless free and premium presets online, which can be downloaded and imported into Lightroom Mobile using the same process described earlier.
By incorporating presets into your Lightroom Mobile workflow, you can save valuable time, streamline your editing process, and create stunning, cohesive images effortlessly. Whether you’re editing landscapes, portraits, or creative compositions, the preset feature makes professional-grade editing achievable in just a few taps, ensuring your photos always look polished and visually captivating.
Lightroom Preset Features
Lightroom presets offer a range of exciting features that make them an invaluable tool for photographers and editors looking to enhance their workflow. These features ensure that presets are easy to use, effective, and accessible for anyone wanting to elevate their photo editing game:
- Free to Download: Lightroom presets are available free of charge, making professional-grade photo editing accessible to everyone, regardless of their budget. These presets are an excellent way to experiment with different editing styles without incurring any costs.
- Premium Color Tones: The presets include premium-quality color tones that allow you to apply advanced edits effortlessly. From vibrant, rich hues to subtle, muted tones, the presets cater to a wide range of creative styles and photography needs.
- Compatible with Lightroom Mobile App: These presets are fully compatible with the Lightroom Mobile app, ensuring you can edit your photos seamlessly on your smartphone or tablet. Whether you’re editing on the go or from the comfort of your home, these presets integrate effortlessly into your mobile workflow.
- No Bugs: The presets are optimized to function smoothly, ensuring a hassle-free editing experience. You won’t encounter compatibility issues or glitches, making them a reliable tool for all your photo editing projects.
System Requirements
Before downloading and using Lightroom presets, ensure your device meets the following minimum requirements for optimal performance:
- Android Version: Your device should run on Android KitKat 4.0 or higher. This ensures compatibility with the Lightroom Mobile app and other supporting software.
- Minimum 1 GB RAM: Your device should have at least 1 GB of RAM to handle the app and editing tasks efficiently.
- Free Storage Space: A minimum of 4 GB of free storage space is required to download, install, and use the presets effectively.
- Latest Lightroom Version: To ensure seamless functionality, make sure the latest version of Lightroom Mobile is installed on your device. This will give you access to all features and tools while ensuring compatibility with the presets.
How to Lightroom Presets Free Download?
Download
Downloading free Lightroom presets is a quick and straightforward process. Follow these simple steps to access and save the presets to your device:
- Scroll Down: Navigate through the page to locate the download section. This is typically where the free presets are made available.
- Find the Download Option: In the download section, you’ll find a visible download button or link labeled for the preset.
- Click to Access: Tap on the download option to initiate the process. This will take you to a screen where you can review the preset details.
- Save the Preset: Once you’re ready, tap the download button to save the preset file to your device. Ensure you have enough free storage space to accommodate the download.
By following these steps, you can easily download and start using free Lightroom presets to transform your photos with stunning edits. Whether you’re a professional or a beginner, these presets provide a simple, effective way to achieve consistent, high-quality results in your photo editing projects.
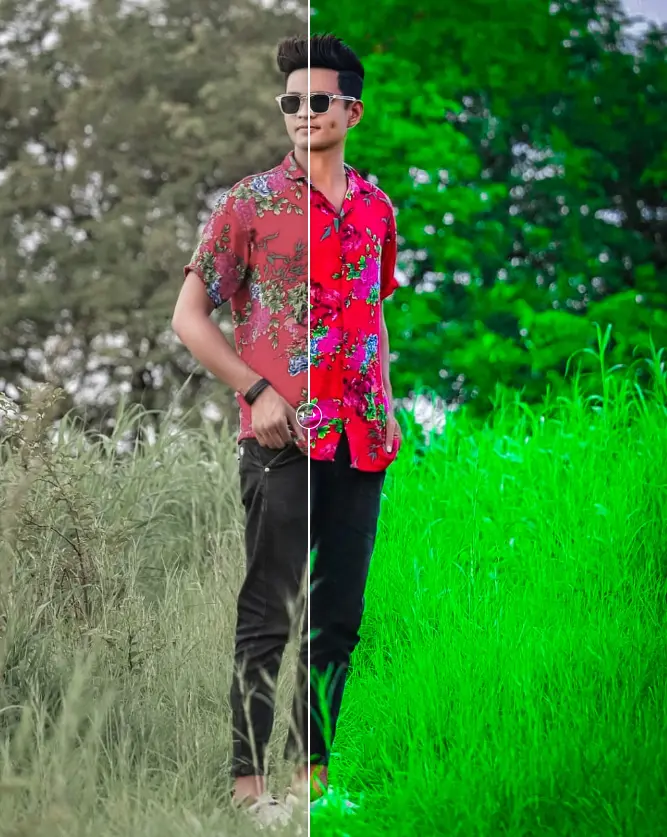
How to Use Green Preset?
Applying the Lightroom Moody Green preset to your photos is a straightforward process that allows you to enhance your images with rich, moody green tones effortlessly. With just a few simple steps, you can give your photos a professional and cohesive look. Here’s how to use the preset effectively:
1. Download the Preset
Begin by downloading the Moody Green preset to your device. Locate the download option provided (typically found in the preset’s description or accompanying instructions) and click it to save the preset file to your phone or tablet. Ensure your device has enough storage space and that the preset is in the correct format, such as DNG, for compatibility with Lightroom Mobile.
2. Open Lightroom
Once the preset has been downloaded, open the Lightroom Mobile app. From the main interface, use the Add Photo option to import the preset into your Lightroom library. Navigate to the folder where the preset was saved, select it, and it will appear as a new image in your library.
3. Access the Preset
After importing the preset, open the image file in Lightroom. Tap the three-dot menu located in the upper-right corner of the screen and select Copy Settings. This action copies all the adjustments and edits embedded in the preset, preparing it for application to other photos.
4. Apply the Preset
To apply the Moody Green preset to your chosen photo, first tap the checkmark to confirm the copied settings. Then return to your library and open the image you want to edit.
5. Paste the Settings
With your photo open, tap the three-dot menu once again and select Paste Settings. Instantly, the rich green tones of the Moody Green preset will be applied to your image.
You’ve now successfully transformed your photo with professional-quality moody green tones in just a few easy steps. If necessary, you can further fine-tune the image using Lightroom’s editing tools to match your specific preferences or the photo’s unique characteristics.
By following this simple process, you can achieve stunning results effortlessly, whether you’re working on nature photography, portraits, or creative projects. Using the Moody Green preset not only saves time but also ensures a polished, cohesive look across all your photos.
Frequently Asked Questions
What is the Lightroom Green Preset?
The Lightroom Green Preset is a professionally designed editing tool that applies a vibrant and mood-enhancing green hue to your photos. It simplifies the editing process by offering a pre-configured setting that can be applied with a single click, saving you time while delivering consistent, high-quality results. Ideal for landscapes, portraits, and nature photography, this preset emphasizes green tones to create an immersive and visually striking aesthetic.
How do I download the Lightroom Green Preset?
Downloading the Lightroom Green Preset is quick and straightforward. Simply click the download button provided on the link where the preset is available. The file will typically be in DNG format, a widely compatible format for Lightroom Mobile. Ensure you have adequate storage space on your device to save and access the preset.
Can I use the Lightroom Green Preset on mobile?
Yes, the Lightroom Green Preset is fully compatible with the Lightroom Mobile app. Once you’ve downloaded and imported the preset into the app, you can easily apply it to any photo in your library. This flexibility allows you to edit on the go, whether you’re using an Android or iOS device.
Will using this preset affect my photo’s quality?
Absolutely not. One of Lightroom’s standout features is its ability to maintain the original resolution, clarity, and sharpness of your photos, even after extensive edits or applying presets. When you use the Lightroom Green Preset, your image will retain its quality, ensuring a professional and polished final result.
Can I customize the Lightroom Green Preset?
Yes! While the preset provides a ready-made green tone, it also allows room for personalization. After applying the preset, you can adjust settings like exposure, contrast, shadows, and color grading to suit your specific style or the unique characteristics of the photo. This flexibility makes the Lightroom Green Preset a versatile tool for photographers of all skill levels.
Is the Lightroom Green Preset free to use?
Yes, the Lightroom Green Preset is completely free to download and use. There are no hidden fees or restrictions, and you can apply it to as many photos as you want. It’s an accessible way to elevate your editing process without additional costs.
Can I use the preset on both Android and iOS devices?
Absolutely! The Lightroom Green Preset is designed to work seamlessly on both Android and iOS platforms. Whether you’re using an Android smartphone or an iPhone, you can enjoy the same smooth functionality and editing capabilities.
What if the preset doesn’t work correctly on my device?
If you encounter any issues, first ensure that your device meets the minimum system requirements and that you have the latest version of the Lightroom Mobile app installed. If the problem persists, restarting the app or reinstalling it can often resolve the issue. For additional help, you can refer to Lightroom’s support resources or forums.
Conclusion
The Lightroom Green Preset is an essential tool for photographers and hobbyists alike, offering a quick and effective way to enhance your images with lush, natural green tones. Whether you’re capturing serene landscapes, lively portraits, or creative compositions, this preset provides a seamless editing solution that saves time without compromising on quality.
With its user-friendly design, compatibility with mobile devices, and ability to retain the original integrity of your photos, the Lightroom Green Preset is a must-have for anyone seeking to elevate their editing process. Best of all, it’s completely free, making it accessible to everyone, regardless of skill level or budget.
From creating a calming atmosphere to adding a bold cinematic effect, the Lightroom Green Preset helps you achieve professional-grade edits in just a few clicks, ensuring your photos always stand out.