

If you’re looking to elevate the quality of your photos and create a professional look, today’s guide is just what you need. Specifically, we’re going to explore Lightroom blur background presets that can add a striking blue tone to your photo’s background. This simple yet powerful editing technique can drastically transform your images, making them more visually appealing and giving them that polished, professional feel.
With Lightroom’s powerful editing tools and presets, achieving a blurred background effect is easier than ever. The ability to blur the background of your photo can make your subject pop, focusing attention where it’s needed most. The added blue tone can create a calming and sophisticated atmosphere, taking your images to a whole new level of visual interest. Whether you’re an amateur photographer or a seasoned pro, this editing technique can be the key to creating photos that stand out, especially on social media platforms like Instagram and Facebook, where aesthetic appeal is everything.
These presets are designed to enhance your images, transforming them from ordinary to extraordinary with minimal effort. If you’ve ever noticed how photos with a blurred background tend to stand out on platforms like Instagram, Facebook, and other social media sites, then you already know the power of a well-edited image. The blurred background not only adds depth but also creates a sharp contrast that draws attention to the subject in the foreground. The professional and polished look that results from such editing can capture more attention and engagement, which is essential for anyone looking to make an impact online.
Photos with a well-blurred background and sharp subject often capture more attention and engagement, which is why this technique has become so popular among social media influencers and content creators. By creating a striking visual effect that separates your subject from the background, you increase the likelihood of viewers focusing on your image for longer. Whether you’re showcasing products, portraits, or landscapes, a blurred background can give your photos that extra edge needed to stand out in a crowded digital space.
In this article, I’ll walk you through the steps of using these Lightroom presets to take your photo editing skills to the next level. You’ll learn how to apply these presets and adjust them to your liking, all while creating a stunning background blur that complements the overall aesthetic of your image. By the end of this guide, you’ll be equipped with the knowledge to create beautifully edited images that not only look more polished but also attract more likes and comments. The process is simple, and the results will be nothing short of amazing.
So, let’s dive into the world of Lightroom editing and give your photos that professional edge. With just a few clicks, you can transform your images from ordinary to extraordinary, drawing more attention and engagement across your social media platforms. Keep reading to discover how you can create visually stunning images effortlessly with the right Lightroom blur background presets.
What are Blue Background Lightroom Presets?
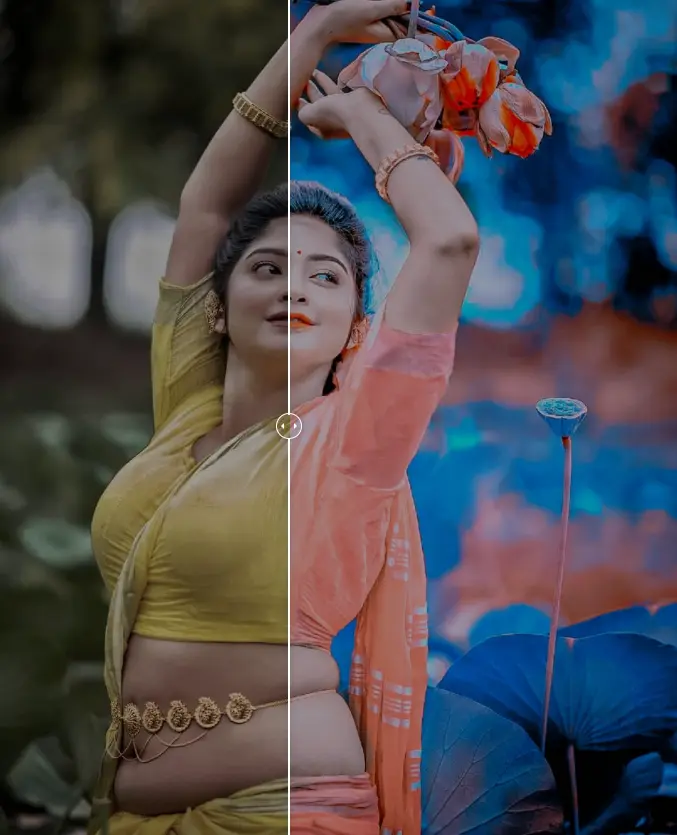
Blue background Lightroom presets are pre-configured settings or filters in Adobe Lightroom designed to precisely alter the background of a photo, giving it a smooth, blurred blue tone. These presets have gained popularity among photographers, influencers, and social media enthusiasts who are looking for an easy and effective way to create visually appealing images. By applying these presets, you can effortlessly infuse your photos with a calming and sophisticated blue hue, which helps elevate the overall quality of the image. The result is a professional look that draws attention to the subject in the foreground, making it stand out more dramatically against the blurred background.
These presets work by automatically adjusting the background tones of your image, adding a soft blur and a subtle blue tint. This effect helps separate the subject from the background, creating a sense of depth that is visually striking. The blue tone not only enhances the aesthetic of the image but also conveys a sense of tranquility and professionalism. With just a few clicks, you can achieve a look that might otherwise take hours to manually adjust, making blue background Lightroom presets an indispensable tool for those who want to quickly enhance their photos without compromising on quality. Whether you’re showcasing portraits, products, or any other subject, these presets can give your images that polished, professional edge, which is especially crucial for standing out on social media platforms like Instagram and Facebook.
How Do Blue Background Lightroom Presets Work?
Blue background Lightroom presets are designed to give your images a stunning, professional look by altering the background with a smooth, blurred blue tone. These presets achieve this by adjusting several key elements of the image, including exposure, contrast, saturation, and the overall tone of the background. The goal is to create a blurred backdrop that enhances the depth of field, making the subject stand out more clearly and sharply. This effect not only helps to focus the viewer’s attention on the subject but also creates a calming and sophisticated atmosphere, making the photo feel more polished and professional.
The key to how these presets work lies in their ability to manipulate specific settings within Lightroom. By adjusting exposure and contrast, they can refine the image’s brightness and shadows, making the subject in the foreground pop. Saturation controls help enhance the richness of the colors, while tweaking the background tones introduces the desired blue hue. The blur effect itself is achieved by softening the background details, ensuring the subject remains the primary focus. This combination of adjustments ensures that the image maintains a high level of visual impact, while the blue tone imparts a sense of tranquility and professionalism. With minimal effort, photographers and social media creators can apply these presets to transform their photos, giving them that signature look that catches the eye and stands out in a crowded digital space.
Key Features of Blue Background Lightroom Presets:
Blue background Lightroom presets are an invaluable tool for photographers and content creators who want to enhance their images quickly and professionally. These presets are designed to simplify the editing process by incorporating several key adjustments, all aimed at creating a visually stunning image with minimal effort. They focus on transforming the background to help emphasize the subject and give your photos a polished, professional look, making them perfect for use on social media platforms like Instagram and Facebook.
One of the key features of these presets is background blurring. By adjusting the aperture and lens settings in Lightroom, the preset effectively softens and blurs the background, creating a shallow depth of field. This not only helps to draw attention to the subject but also adds a sense of depth and dimension to the image. The blurred background provides a smooth, visually appealing backdrop that doesn’t compete with the subject, allowing it to stand out.
Another important feature is blue color toning. The preset typically incorporates blue hues and cool tones into the background, giving the image a serene and cohesive look. These cool tones help to create a calming effect, while also adding a touch of sophistication and professionalism. The blue backdrop can evoke feelings of tranquility, making it an excellent choice for portraits, product photography, or any image where you want to maintain a polished and polished aesthetic.
In addition, these presets are designed to focus on the subject. By softening and de-saturating the background, the preset ensures that the main subject of the photo stands out more clearly. The de-saturation of the background elements ensures that the subject takes center stage, creating a sharp contrast that enhances the overall visual impact. This technique makes the subject appear more prominent and focused, making it the focal point of the image.
Finally, one of the most significant advantages of using blue background Lightroom presets is their time-saving nature. Instead of manually adjusting multiple settings, these presets apply several adjustments with just one click. This efficiency allows you to quickly enhance your images without sacrificing quality. Whether you’re a professional photographer or a casual content creator, these presets make it easy to achieve a high-quality, visually striking look in a fraction of the time it would take to edit the image manually.
Why Use Blue Background Lightroom Presets?
Blue background Lightroom presets are an essential tool for photographers, influencers, and content creators who are looking to elevate the visual quality of their images quickly and effectively. By using these presets, you can effortlessly add a blue-toned background that helps create a more sophisticated and professional look. This simple yet powerful editing tool has become increasingly popular among those looking to achieve a polished aesthetic without spending hours on manual adjustments.
One of the primary reasons to use blue background Lightroom presets is their aesthetic appeal. A blue-toned background can instantly add a sense of sophistication and calmness to your photos. The cool hues of blue help create a serene atmosphere, making your subject the focal point of the image without overwhelming the viewer. This is especially useful for portraits, product photography, and social media content, where the goal is to highlight the subject while keeping the background visually interesting but not distracting. The subtle blend of blue tones works in harmony with the rest of the image, creating a balanced and attractive composition.
Another compelling reason to use these presets is consistency. For content creators and professionals who manage multiple images—whether for social media, blogs, or portfolios—ensuring a cohesive look across all photos is crucial. Blue background Lightroom presets make it easy to maintain a uniform editing style, giving your entire collection a polished and cohesive aesthetic. This consistency helps establish your personal brand, making your images instantly recognizable and visually appealing across different platforms.
Lastly, ease of use is a major benefit of blue background Lightroom presets. Whether you’re a seasoned photographer or a beginner, these presets allow you to create high-quality, professional-looking images in a fraction of the time it would take to manually adjust individual settings. Instead of spending time adjusting exposure, contrast, and saturation, you can apply the preset and achieve the desired effect with just one click. This makes it a time-saving and efficient tool for anyone who wants to enhance their photos without getting bogged down in the technical aspects of editing. With these presets, you can focus on the creative side of photography while ensuring your images maintain a high level of professionalism.
Where to Use Blue Background Lightroom Presets
Blue background Lightroom presets are an invaluable asset for photographers and content creators looking to elevate their images with minimal effort. These presets allow you to enhance the background of your photos by adding a dreamy, soft blue tone, which in turn makes the subject stand out sharply. Whether you’re a professional photographer, an influencer, or someone who just wants to create beautiful images for personal use, these presets can help you achieve a polished, professional look that’s perfect for various types of photography and visual content.
One of the best places to use blue background Lightroom presets is in portrait photography. The soft, blurred blue background creates a striking contrast with the subject, allowing them to pop in the frame. This technique is particularly effective for portraits, where the goal is to emphasize the subject’s features while maintaining a smooth, aesthetically pleasing background. The blue tones add a sense of calmness and sophistication to the overall image, making portraits feel both polished and professional.
In product photography, these presets can be a game-changer. Whether you’re showcasing fashion items, tech gadgets, or any other product, the blue background creates a clean and modern look that enhances the overall appeal of the item. The subtle blue tone adds an extra layer of style and sophistication, helping the product stand out without overpowering it. This makes blue background presets an excellent choice for e-commerce sites, marketing materials, or any photography that aims to present products in the best light.
When it comes to social media posts, blue background Lightroom presets are perfect for platforms like Instagram and Pinterest, where visual impact is key. The blue tones create a unique, recognizable aesthetic for your brand or personal page, setting you apart from the sea of images on social media. Whether you’re posting portraits, lifestyle shots, or branded content, these presets will help ensure that your images look cohesive and visually striking, attracting more likes, shares, and engagement from your audience.
Blue background Lightroom presets also work wonders in wedding or event photography. The soft blur and cool tones in the background add a subtle elegance to the photos, while ensuring that the subjects—whether they are the bride and groom or guests—remain the focal point. The result is a more polished and refined image that exudes professionalism. Whether it’s a wedding, corporate event, or family gathering, these presets can make your event photos stand out and feel special, giving them a touch of sophistication that lasts long after the moment has passed.
By using blue background Lightroom presets, you can quickly transform your photos into works of art that have a refined, professional look. These presets save you time in post-production and provide a level of consistency and quality that can be hard to achieve manually. Whether you’re editing for personal use, content creation, or professional projects, these presets offer the perfect solution for achieving a polished, visually appealing aesthetic with minimal effort.
How To Use Blur Background Lightroom Presets?
Using blur background Lightroom presets is an easy and effective way to enhance your photos and give them a professional look. Whether you’re a beginner or an experienced photographer, these presets can help you achieve stunning images with minimal effort. By applying a smooth, blurred background, your subject will stand out more sharply, giving the photo a polished, sophisticated appearance. With just a few simple steps, you can transform your photos and create a visually striking effect that looks both professional and eye-catching.
Here’s a step-by-step guide on how to use these presets to enhance your images:
Step 1: Download the Lightroom Preset
Before you can use the preset, you’ll need to download it. There are plenty of sources online where you can find high-quality blur background Lightroom presets, both free and paid. Once you’ve downloaded the preset file, ensure you extract it if it comes in a compressed folder.
Step 2: Import the Preset into Lightroom
- Open Adobe Lightroom on your computer.
- In the Develop Module, go to the left panel where you see the “Presets” section.
- Right-click on the “Presets” panel and select Import.
- Navigate to the location where you saved the downloaded preset file and select it.
- After importing, the preset will appear under the User Presets section in the Presets panel.
Step 3: Select Your Photo
Choose the photo you want to edit from your Lightroom catalog. To get the best results, it’s recommended to choose an image with a clear subject and a background that could benefit from a smooth blur effect. Portraits or product images often work well for this kind of editing, as the blur enhances focus on the subject.
Step 4: Apply the Blur Background Preset
In the Develop Module, click on the preset you imported under “User Presets.” The preset will automatically apply the blur effect to the background, along with any other adjustments associated with it, such as color toning, exposure, and contrast.
Note: If you want to fine-tune the effect, feel free to adjust the settings like Exposure, Contrast, or Saturation using the sliders in the Develop panel. This allows you to tailor the effect to your specific image.
Step 5: Refine the Background Blur (Optional)
If you want to adjust the level of background blur or change the intensity of the blue hue:
- Use the Adjustment Brush: You can use the Adjustment Brush tool to paint over areas where you want to refine the blur or apply the blue tint more selectively. Set the brush to affect the background by reducing the sharpness and adding a blue tint. Adjust the Blur slider in the brush settings to enhance the background blur.
- Use the Radial Filter: For more control, use the Radial Filter to create a custom blur effect around your subject. You can position the filter to focus on the subject while blurring the rest of the image. This tool allows for greater precision and a more tailored look.
Step 6: Final Adjustments and Export
After applying the preset and making any necessary refinements, review your image to ensure everything looks balanced. You can make additional tweaks if needed, such as adjusting the White Balance, Exposure, or Contrast for the final touch.
When you’re satisfied with the result, go to File > Export to save your edited image. Choose the desired format (JPEG, TIFF, etc.), resolution, and quality settings before exporting.
By following these steps, you can easily use blur background Lightroom presets to enhance your images, giving them a professional, polished look with minimal time and effort. Whether you’re editing portraits, product photos, or any other type of image, these presets can help you create stunning visuals that make your subjects stand out and leave a lasting impression.
Download Preset
Frequently Asked Questions
What are Blur Background Lightroom Presets?
Blur background Lightroom presets are pre-configured settings in Adobe Lightroom designed to apply a blurred, out-of-focus background to your photos. These presets alter the background of an image, giving it a smooth, gradient blur, often with blue hues, that makes the subject stand out. This effect mimics a depth-of-field look similar to what you might achieve with a high-quality camera lens, providing a professional and visually engaging result. They’re particularly useful for emphasizing the subject and creating a polished final image with minimal effort.
Can I Use Blur Background Presets on Any Type of Photo?
Absolutely! Blur background presets can be used on a variety of photo types, including portraits, product photography, landscape shots, and event photography. The effect works best on images where the background can be effectively blurred without losing critical details. Portraits are one of the best subjects for these presets, as the blurred background helps direct the viewer’s focus to the subject, creating a sharp and visually appealing contrast. However, the presets can also enhance other types of photography depending on the desired effect.
Are Blur Background Lightroom Presets Free or Paid?
There is a range of both free and paid blur background Lightroom presets available. Free presets are commonly found across photography blogs and websites, and they can be a good starting point for casual photographers. However, they may offer fewer customization options or advanced features compared to paid presets. Paid presets, on the other hand, often provide additional flexibility, more professional-grade adjustments, and enhanced customer support. Many premium presets also include tutorials or extra preset options tailored for different photo styles.
Can I Adjust the Intensity of the Blur Effect?
Yes, you can! While the preset applies a general blur effect to the background, Lightroom gives you the ability to fine-tune the intensity. Using tools like the Adjustment Brush or Radial Filter, you can increase or decrease the blur effect to suit your image’s needs. Additionally, sliders like Clarity, Dehaze, and Sharpness allow for further refinement of the blur effect, giving you full control over the final result. This ensures that your image can be personalized to achieve the perfect look.
Will Using a Blur Background Preset Affect the Quality of My Photo?
No, using a well-designed blur background preset should not negatively impact the quality of your image. In fact, a high-quality preset can enhance the overall image, improving the background blur and making the subject more prominent. As long as you start with a high-resolution photo, the quality will remain intact, or even improve. Some presets are designed to enhance the details and sharpness of the image, ensuring that your final output is clear and professional, even with the background modifications.
Can I Use Multiple Presets for One Photo?
Yes, you can layer multiple presets or combine different preset effects for a customized look. For instance, you can apply the blur background preset first and then add another preset to adjust the colors, tone, or contrast of the image. It’s essential to tweak the settings after applying each preset to ensure they blend harmoniously. By doing so, you can avoid creating unnatural results and ensure that each layer of adjustments enhances your photo without overwhelming it.
Will Blur Background Presets Work on All Lightroom Versions?
Yes, blur background presets are compatible with both Lightroom Classic and Lightroom CC (cloud-based). However, the installation process may vary slightly depending on which version you are using. Make sure you’re working with a version of Lightroom that supports .xmp or .lrtemplate files, as these are the common formats used for importing presets. Always check that your version of Lightroom is up to date to ensure compatibility with the latest presets.
Conclusion
Blur background Lightroom presets are a transformative tool for anyone looking to elevate their photography quickly and easily. Whether you’re a professional photographer or a social media enthusiast, these presets offer an efficient way to create polished, visually captivating images. By applying a smooth, blurred effect—often in a calming blue tone—you can make your subject pop, add depth to your photo, and achieve a professional, cinematic look.
The beauty of these presets lies in their simplicity. With just one click, you can enhance your photo and give it a sophisticated, polished finish. Whether you’re working with portraits, product photography, or event shots, these presets allow you to create stunning images in just a fraction of the time it would take to manually edit each setting. With the added benefit of customization, you can truly make your photos stand out and capture the attention of your audience.